Stand With Ukraine. Stop Putin. Stop War.

Hello! Welcome to my humble web presence. I'm Mark Hamstra, 33 years young, wearer of many hats at modmore, resident of Leeuwarden, the Netherlands. Most of my time is spent building and maintaining awesome extras and tools at modmore, but I also love gaming, cooking, and my dogs. More about me.

This site is where I share thoughts, cool projects and other oddities related to MODX, xPDO and ExtJS. I also write about MODX regularly over at MODX.today. Sometimes I post three blogs in a week, sometimes there's nothing new here in a year. Read a random article.


One of the changes in MODX 2.2 is a completely refactored class-based processor system, allowing you to create processors for components more easily than ever. As with everything new and shiny, there's some nice tricks you can use.

I've been using these class-based processors in my latest project, and want to share my experience with it so far, as well as showing some actual, functional code.

What's a class-based processor?

If you've gone through the Developing an Extra tutorial before, you'll know what a processor is: the php code that gets executed by your AJAX connector (or modX::runProcessor) which does whatever needs to be done, and returns JSON.

The class-based part of this all means you can simply use something like the following for a custom "update" processor:

<?php
class fdmPriceCodeUpdateProcessor extends modObjectUpdateProcessor {
    public $classKey = 'fdmPriceCode';
    public $languageTopics = array('frontdeskman:pricing');
    public $objectType = 'fdmp';
}
return 'fdmPriceCodeUpdateProcessor';

... and the MODX core will handle the rest. :) Another example of a class based processor can be found in my What's new in MODX 2.2 post.

What the modObjectUpdateProcessor Process does

Despite the low amount of code we've used, there's a lot of work being done behind the scenes to make sure your update (or other process) is executed like it should. By inspecting the modProcessor class, here's the 14-step process I found for the modObjectUpdateProcessor.

  1. Your processor gets instantiated on the request, properties are being set.
  2. The checkPermissions() function is run which you can use to verify any custom permissions are enabled.
  3. The getLanguageTopics() function is run, which should return an array of lexicon topics to load, which are then loaded.
  4. Processor function initialize(): gets the primary key (from the public variable primaryKeyField which defaults to "id"), gets the object based on the classKey and posted primary key value and if it's an extension of modAccessibleObject it checks the user session against the "save" policy. If the initialialize function doesn't return true, the request is cancelled with an error message.
  5. Processor function beforeSet() is run: by default that function only checks if there are any errors set (by $this->addFieldError('fieldname','error') for example). If this doesn't return true, a failure is returned by the processor.
  6. fromArray() is called on the object (available as $this->object) with all posted properties.
  7. Processor function beforeSave() is run. As with the beforeSet function, this only checks if any errors were registered. If the result is not a boolean true, the processor returns a failure with the value returned as message.
  8. validate() is called on the object. If this doesn't return a positive value, the error messages are set as field errors.
  9. If you set a beforeSaveEvent variable on the class, that event is invoked and if that doesn't return true the save is prevented. While the fireBeforeSaveEvent() function is marked as public, you will probably not want to override this in regular cases.
  10. The saveObject() function is run which simple calls save() on the object. According to the inline comments, this may be overriden for transient and non-persistent object updating.
  11. The fireAfterSaveEvent() function is run, which fires the event you specified in the afterSaveEvent class variable.
  12. The logManagerAction() function is run, which logs a generic message to the Manager Log (available under Reports > Manager Actions).
  13. A success message is returned through the cleanup() function, this actually wraps the pre-2.2 $modx->error->success/failure often used in processors.
  14. The result (success or failure) is parsed into a modProcessorResponse object and returned.

If you look backup, you'll see a lot of bold text. These functions or variables are available for you to override and extend to force it into doing what you need it to do. Note that every processor class (for create, update, getlist, remove and get) has its own functions. If you use an IDE like PhpStorm you can get code hinting, or just dive into the source!

Extending our Processor class to handle Checkboxes

When you've made a beautiful modExt/ExtJS window, and sticked your "active" checkbox (xtype: 'checkbox') in there, you may not exactly get the results you were expecting. Perhaps your schema expects a boolean "true" or "false" (I know mine does!) which would be stored as a tinyint 1 or 0 in the database.. but the form posts a string value "on" if the field is selected, and an empty value if not. Uh oh..

Luckily we've got so many functions we can add to our update processor class to make sure it parses those values into what the object's fromArray (or set) function needs to save it properly.

If you look back to our 14-point list above, you'll see fromArray is executed in step 6, meaning we need to change our property its value before step 6. How does the "beforeSet" function in step 5 sound to you? Sounds like it would work, to me!

If you're not at all familiar with object oriented programming, all the stuff explained so far may sound a bit daunting, but all that we're really doing is overwriting the functions of the original class to do what we want. There's plenty of PHP OOP tutorials on the web should you want to learn more about that.

So, with beforeSet and our expected and needed values in mind, here's our new and improved class which properly handles checkboxes in a MODX 2.2 style processor.

<?php
class fdmPriceCodeUpdateProcessor extends modObjectUpdateProcessor {
    public $classKey = 'fdmPriceCode';
    public $languageTopics = array('frontdeskman:pricing');
    public $objectType = 'fdmp';

    public function beforeSet() {
        $this->setProperty('active',($this->getProperty('active') == 'on'));
        return parent::beforeSet();
    }
}
return 'fdmPriceCodeUpdateProcessor';

I've put it all on one line using a ternary operator and the Processor's getProperty and setProperty functions, but if you prefer a bit more verbose coding, you could also do just this which works exactly the same:

/* ... */
    public function beforeSet() {
        $active = $this->getProperty('active');
        if ($active == 'on') { $active = true; }
        else  { $active = false; }
        $this->setProperty('active',$active);
        return parent::beforeSet();
    }
/* ... */

We could also do something similar in a remove processor, to prevent removing something if it's still linked to another thing. For example the following Processor which prevents removing a "fdmCharacteristic" object if there are still related "fdmRoomTypeCharacteristic" objects.

<?php
class CharacteristicRemoveProcessor extends modObjectRemoveProcessor {
    public $classKey = 'fdmCharacteristic';
    public $languageTopics = array('frontdeskman:property');
    public $objectType = 'rtc';
    
    public function beforeRemove() {
        $chars = $this->modx->getCount('fdmRoomTypeCharacteristic',array('characteristic' => $this->getProperty('id')));
        if ($chars > 0) {
            return $this->modx->lexicon('rtc.remove.roomtypesStillLinked');
        }
        return parent::beforeRemove();
    }
}
return 'CharacteristicRemoveProcessor';

And the final example for today extends the modObjectGetListProcessor to join a table and filter on properties, which is done by extending the prepareQueryBeforeCount function. This one also has a couple more variables we're assigning:

<?php
class RoomTypeGetListProcessor extends modObjectGetListProcessor {
    public $classKey = 'fdmRoomType';
    public $languageTopics = array();
    public $defaultSortField = 'name';
    public $defaultSortDirection = 'ASC';
    public $objectType = 'fdmRoomType';

    /**
     * @param xPDOQuery $c
     * @return \xPDOQuery
     */
    public function prepareQueryBeforeCount(xPDOQuery $c) {
        $query = $this->getProperty('property');
        if (!empty($query) && is_numeric($query)) {
            $c->innerJoin('fdmRoomTypeProperty','RTP','fdmRoomType.id = roomtype');
            $c->where(array(
                'RTP.property' => (int)$query
            ));
        }
        return $c;
    }
}
return 'RoomTypeGetListProcessor';

A note on Checkbox fields in modExt

I tend to use the "checkbox" xtype, however as of MODX 2.1 there is also a special "xcheckbox" xtype which always posts a value (1 or 0 if I remember correctly). I'm not sure why I don't use it, but it might be that the class-based processors do properly function with that one. Just didn't check, and I like being in control. :)

"Just wondering.. Are you working on a Property Management component?"

How'd you know?! :)

Was it the "fdmRoomType", "fdmRoomTypeCharacteristic" or "fdmProperty" object that gave it away? :)

This super-duper awesome extra I am working on is called FrontDeskMan and I hope to finish it over the coming few weeks. It will not become available as an open source project however, but most likely will be a licensed and properly supported Extra for the Hospitality industry as a joint op between myself and Jared Loman. You should totally start warming up some local Hotel clients for a new website with integrated property management and reservations for when we launch!

ExtJS is probably one of the biggest challenges when it comes to building components in MODX. It's not mandatory to use it, but as most people will want their components to blend in perfectly, it's an easy choice to make... This blog post will hopefully shine some light on how modExt and ExtJS blend together, and how to use the ExtJS API Docs to keep you going. Oh, and I'm throwing in some ExtJS tips & tricks here and there for the careful reader.

What exactly *is* modExt?

Real simply put you could say modExt is the same as ExtJS, but then with some additions (extensions) by the MODX Core Team and the actual back-end theme installed by default. As ExtJS is a class (or object) based JavaScript framework, so is modExt. It's important to remember that you're not limited to just the modExt implementation - no, you have the entire ExtJS framework at your disposal. Parts of that ExtJS framework have been extended (remember it's an object-based framework? Long live OOP!) to provide some specific functionality. This extended functionality is available through the "MODx" JavaScript variable - all non-overriden functions and classes are available in the "Ext" variable.

Why is it important to realize modExt is just an extension?

Well, if you are anything like me when I first started with components, you have been staring at the modExt documentation for ages but never actually got anything working out of that information. Which now makes sense, as it only lists the (most important) extended classes - not everything you can use!

That's where the ExtJS 3.4.0 API Docs come in. And boy, they are huge! And, if you know where to look, they're definitely very, very valuable.

Getting Practical: taking bdListings as an example

Just to catch up (I assume that if you made it this far into the post, you at least have been working with modExt/ExtJS a bit and understand its general syntax), here's an example of a grid using the modExt implementation of an ExtJS grid which I'll be tearing apart to show the difference between modExt and ExtJS. As it's a quite long example I have cut out some pieces (denoted by /* ... */), you can see the complete source on Github if you want.

bdListings.grid.TargetGroups = function(config) {
    config = config || {};
    Ext.applyIf(config,{
        url: bdListings.config.connector_url,
        id: 'grid-targetgroups',
        baseParams: {
            action: 'mgr/targetgroups/getlist'
        },
        params: [],
        viewConfig: {
            forceFit: true,
            enableRowBody: true
        },
        tbar: [{
            xtype: 'button',
            text: _('bdlistings.create',{ what: _('bdlistings.target') } ),
            handler: function() {
                win = new bdListings.window.TargetGroups();
                win.show();
            }
        }],
        paging: true,
        primaryKey: 'id',
        remoteSort: true,
        sortBy: 'order',
        fields: [
            {name: 'id', type: 'int'},
            {name: 'name', type: 'string'},
            {name: 'sortorder', type: 'int'}
        ],
        columns: [{
			header: _('id'),
			dataIndex: 'id',
			sortable: true,
			width: 1,
            hidden: true
		},{
			/* ... */
		}]
    });
    bdListings.grid.TargetGroups.superclass.constructor.call(this,config);
};
Ext.extend(bdListings.grid.TargetGroups,MODx.grid.Grid,{
    getMenu: function() {
        var r = this.getSelectionModel().getSelected();
        var d = r.data;

        var m = [];
        m.push({
            text: _('bdlistings.update',{what: _('bdlistings.target')}),
            handler: function () {
                win = new bdListings.window.TargetGroups();
                win.setValues(d);
                win.show();
            }
        },'-',{
			/* ... */
        });

        if (m.length > 0) {
            this.addContextMenuItem(m);
        }
    }
});
Ext.reg('bdlistings-grid-targetgroups',bdListings.grid.TargetGroups);

What I want to highlight with this example are the parts given to you by modExt, and what is actually plain ExtJS. I'll just go through the code from top to bottom and highlight a few things of importance.

  • Line 4, 6-9, 26-39. In vanilla ExtJS, every Grid has a data store, which holds the data definitions and values. As MODX components mostly work with AJAX connectors which return JSON, you get the opportunity to instantiate a store without assigning one manually. This works by defining the "url" property (which in this case is the value of the bdListings.config.connector_url, pointing to assets/components/bdlistings/connector.php which acts as our, well, connector). Beyond the url property, we also need to define our action (we can do this as a baseParam or as a regular configuration option - both work), the different fieldnames we expect (line 26-30) and what columns we want to display (line 31-39). These variables are used to create an Ext.data.JsonStore which works seamlessly with the JSON array returned by processors. Conclusion: these properties are a shortcut to an Ext.data.JsonStore, but if you prefer you can still define them manually as you will find all over the Sencha forums and Documentation.
  • Line 16,50. To add easy internationalization (commonly shortened to "i18n" for "starts with an i, then 18 characters, and ends with a n"), you will notice a tiny function with the following signature: _('key',{arrayOf: 'options'}). This is a JavaScript function available throughout the MODX Manager that checks the loaded Lexicons for the key you want. If there's any placeholders in them, you can specify the values for those via the second parameter. Conclusion: this is MODX specific and you wont find it in the ExtJS forums/docs.
  • Line 14-20: While toolbars (defined as a "tbar" or "bbar" for bottom toolbars) are not specific to modExt and they work the same as the ExtJS tbar configuration, there are cases where modExt throws in some bonuses. For example when extending a MODx.tree.Tree you will see that there is already a toolbar defined. Anything you add to the tbar configuration is added after it. If you don't want the default buttons (expand, collapse and refresh) you can set the useDefaultToolbar property to a boolean false and it will only load your own tbar config. Anything else is inherited from ExtJS. Conclusion: works the same as ExtJS, but in some components these will have default configurations.
  • Line 43 shows we are using our own object bdLisings.grid.TargetGroups from the MODx.grid.Grid object. If we were to look at the MODx.grid.Grid documentation, one of the first things we'll see documented is that it extends the Ext.grid.EditorGridPanel object (in turn extended from the Ext.grid.GridPanel object), which means we can use all of that object's properties and functionality with the added stuff from the MODx.grid.Grid documentation. Conclusion: Check out the Ext.grid.EditorGridPanel documentation often!
  • Line 44-63 is a true genius (and also mentioned in the MODx.grid.Grid documentation), and is what shows your right click context menu without having to mess with "rowcontextmenu" listeners, mouse positions and what not (boy has that taken me debug time before!). Basically you instantiate a new Array (in the core often called "m" and use m.push() with the Ext.menu.Item configuration options for every item you want to add to the menu. In the end you can (line 60-62 in this example) call the components' addContextMenuItem method, or (as of MODX 2.1) simply return the array "m". On line 56, the dash will be transformed into a subtle border between the menu items. Note that you can access the right-clicked item in the grid as "this.menu.record" in case you need conditional menus. Conclusion: This is one of the modExt extensions I'm really fond off.

I think my point would be clear... use the ExtJS 3.4 Documentation! Now, on to the next question.. how do we use that?

How to work with the ExtJS Documentation

The ExtJS documentation is huge and really has all the answers you need. Just formulate the questions right!

First find out what the class name is of what you are looking to use. Perhaps you are looking at someone else's code, check out the Ext.extend() line in that case. To related back to the grid example, we saw that extended MODx.grid.Grid which in turn extends Ext.grid.EditorGridPanel. That's the info we need! Open up the ExtJS docs and simply navigate the right tree. Ext > grid > EditorGridPanel. You'll see a few things:

  1. Usually a description of what the class does and some examples. An inheritance chart to the right to see where it's coming from.
  2. Then the config options, which is what you will most often work with. They usually list the default and possible values and, depending on the option, also some code examples.
  3. Somewhere down (halfway the EditorGridPanel doc) you'll find the Properties section. These are variables available "to the outside" when you have a reference to an object. For example "this" depending on the context or "Ext.getCmp('id-of-my-grid')" from anywhere else. You can use this to check the state or configuration of an object.
  4. Further down you'll find the Methods, you can call these on the object. The methods may change its configuration (eg addClass), or return a value to you (eg getPosition). Whenever I have a reference to an object, I like to send it to the console with console.log, allowing me to see that list of methods in Firebug when I need it. (Chrome's Dev Tools doesn't seem to show the available methods).
  5. Waaaay at the botton you'll find a list of Events. These are being triggered by the component or it's parent objects and allow you to hook into certain stuff going on. On top of listing the events, it also lists the parameters it can pass to your callback function.

So basically that's all the information you can possible need about the ExtJS objects. Now get cracking with that component!

Note: I know that doesn't even come close to everything you may need to know, but I think it would've helped me back when I started to have someone point me to a list of events and configuration options for modExt objects.. I've used a bookmark to check what events are bubbling up for months, and abusing console.log into eternity, but having an actual list is amazing! ;)

Oh, one last thing about modExt..

It's very helpful to check out what modExt offers you, and what default configuration may be set if you are extending MODx objects. You can find all the modExt files in /manager/assets/modext/. As there's quite a lot of files in there, I'd like to highlight what you can find in the different folders (relative to the /modext/ folder):

  • core - contains the building blocks of modExt. The actual MODx object in modx.js, the layout builder in modx.layout.js and the base component in modx.component.js. Not the best place to start with modExt if you'd ask me.
  • sections - in the terminology used by the MODX team for both the MODX Core and a number of Extras, a "section" is what kicks off building the interface, by loading an xtype and possibly setting variables. Not too interesting as an extra developer imo.
  • util - contains a few extra xtypes/components you can use including a date+time field, a lightbox and the core upload dialog. The utilities.js file also contains 3rd party components such as superboxselect and some other little gems. Something to check out some time.
  • widgets - now it's getting interesting! A widget can be anything from a panel, grid or window to an individual combobox. The base objects are located in this widgets/core directory, so you can find the MODx.grid.Grid definition there, as well as MODx.tree.Tree and the MODx.Console as well as many more. Their applications in the MODX Manager are in all the other folders under widget, so if you see something in the Manager you want to mimic.. the odds are they're in the widges folder :)
  • workspace - the workspace is special as it's widgets and sections in one folder, specifically for the workspace (basically Package Manager and everything around it).

Don't be afraid to check out the source of the Core or other Components!

While there is most likely a much, much longer preparation to this great news, there was a very fascinating tweet this afternoon by Digital Butter, a MODX Premier Partner based in Hong Kong, which happens to be one of my clients last summer.

In case you missed it, here's the tweet and accompanying screenshot that was tweeted:

For anyone who has worked with Media Sources before, this screen shouldn't be unfamiliar (minus that new "Dropbox" option!). If you haven't yet, however, you need to know that a Media Source is some kind of abstraction for the file tree as well as file browser in MODX. Prior to MODX 2.2 it was a pain to properly assign different permissions to different user groups, and when throwing some contexts into the mix it quickly got ugly. Now with MODX 2.2 you can create Media Sources which can be assigned to specific Template Variables, have certain base paths/urls so only certain areas of the filesystem are visible and more. However it also adds the ability for different storage systems, such as the Amazon S3 bucket which is included in the core. From the start it was clear that it would be able to offer more if people would develop the integrations. If I were to guess, a Flickr and Dropbox integration were the top two requested media source types. And, according to that tweet, we can now add Dropbox to the mix! (Don't have Dropbox yet? Feel free to use my referal link to give me an extra 250mb of space when you sign up.. much appreciated!)

You can probably imagine I got a little excited (and sidetracked from work, obviously) when I saw the tweet.. and to add to that, no more than two minutes after hitting the ReTweet button I got an email from James Bodell (lead Digital Butter fella and a great guy in general) titled "give this a spin", complete with a beta version of the package attached. Wicked!!! And so, I went off to investigate and see just how complicated it would be to get Dropbox integrated into my local test install. Turns out, it aint too bad but is frick'n awesome!!

How does it work?

After installing the package, there's a few steps you need to take.

  1. Create a Dropbox Application and get the App Key and Secret codes from here.
  2. Create a new Media Source (see the screenshot that was tweeted above), choosing "Dropbox" as Source Type.
  3. Update the Media Source, and fill in your App Key in the consumerKey property, and the App Secret into the consumerSecret property. Also make sure the accessType is correct - this depends on what you chose while setting up your Dropbox application, and in my case this was the Application Folder. Save the properties.
  4. Refresh the page (this is needed for the Media Source to verify your App details), and expand the description for the authToken by clicking the green plus sign. You should now see a link there (if not, your App details probably weren't valid or you didn't refresh the page) which you need to click to authenticate the Media Source to access your dropbox.

And that's it, and it doesn't take more than a minute or two (and adding some files to your new Dropbox/Apps/Name Of Application/ folder and letting that synchronize to the web) to end up with Dropbox integrated within MODX seamlessly.

Dropbox Media Source in Action

As with other Media Sources, you can restrict access to the Media Source through the Access Permissions tab so you have full control over who can access is and who can't.

Using the Dropbox Media Source

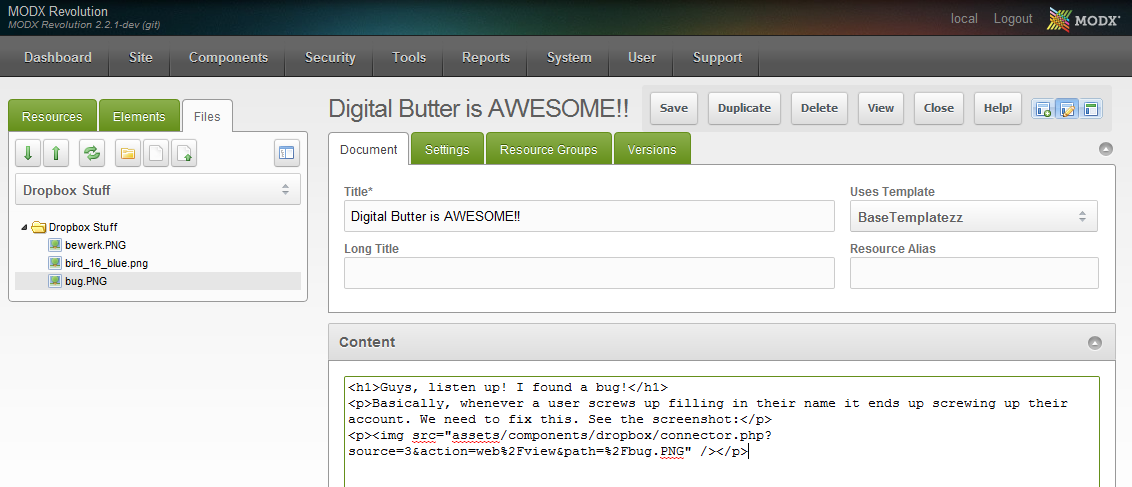
To use your Dropbox Media Source, it's probably easiest to drag and drop from your Files tab to the content or where-ever you want to use your Dropbox files. For example, if I wanted to write an article about some crazy bug I found, and I added the screenshot for it to my dropbox's app folder, I can write my content and drag the bug.PNG file to where I need it to appear. It will automatically get the right link which routes the request through your Media Source configuration and returns the proper file.

Using the Dropbox Media Source

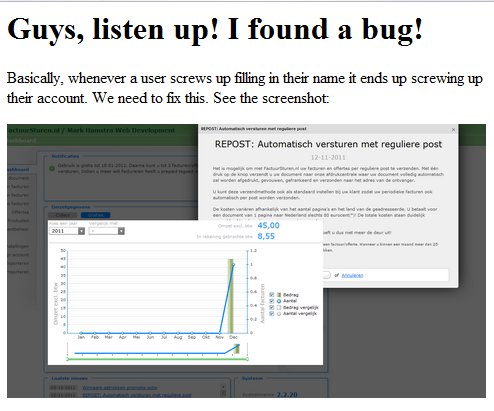
Which results in your image being displayed as normal...

Front-end display of MODX Dropbox Media Source by Digital Butter

James told me they are not ready to publicly release it yet as the amount of support requests and bug reports coming in would be too much for them to handle right now, and instead they are having the team and friends beta it for a bit. I'll definitely be playing with this some more, and hopefully this will see a release for others soon. You can however find a package and the source on Github.

Now, I don't know about you, but I think we owe our Hong Kong MODX Development friends a round of applause for making this happen!

I like numbers, and analyzing them to see what is going on. As a result of that, I spend too much time in my Google Analytics code figuring out what is going on with my site and what content is most appreciated. However, I keep on finding non-public URLs for blogs which haven't been published yet in my stats.. but no more.

These visits are from when I visit a blog post which I've written to give it a quick proof-read, or to make sure the code blocks show up like they should. While not a disaster, I want to tackle this inconvenience and stop tracking my own visits. And hey, perhaps you can improve the quality of your clients' statistics with the same thing as well?

The Different Options and Considerations

There's a few things you can do. You can disable tracking for your IP through a Google Analytics filter, or by setting up a special page on your website/domain which sets a user cookie indicating we don't want Google Analytics to track us. While that would work, I also use my phone with HandyMan on 3G to work on my site or respond to comments and it would become a bit cumbersome to keep visiting a no-track page everytime I want to check my own site (as I'm pretty sure my phone's 3G IP changes quite often).

I just want to make sure anyone that is logged into the manager is not being tracked. So, perhaps I should just whip up a quick plugin that sets the Analytics cookie from the manager? Too bad that doesn't solve the issue when working on content on my phone yet...

Let's just get rid of the code!

The option I ended up going with is to just get rid of the entire Google Analytics code whenever I'm logged in on the Manager. This will work with HandyMan, as that simply logs you in to the manager as well, and I can live with seeing my own pageviews in my stats when I'm commenting on something without being logged in - after all, that's pretty much a valid request, right? :)

For this I first tried the "memberof" output filter on the 0 tag, however that gave problems when there was no user logged in as it returned a fatal error.. oops. I suspect this has been addressed in MODX 2.2, but as I haven't had the chance to test some quick-'n-dirty custom coding on my site in 2.2, I'm delaying doing the upgrade for now (tho it is a frick'n awesome release and I did launch some sites on it already!).

Now what? Custom snippet to the rescue!

Instead I quickly rolled my own code in a tiny snippet I called "isAdmin". The snippet looks somewhat (well, exactly) like this:

if ($modx->user instanceof modUser) {
  if ($modx->user->hasSessionContext('mgr')) { 
    return true;
  }
}
return false;

All it does is check to make sure we've got an active user account, and if we do it checks if we are authorized for the "mgr" context. It either returns true (which translates to 1) or false (0), so on its own it's not too useful yet.. however that does work pretty well with the "empty" and "notempty" output filters/modifiers.

Using the Snippet & Output Filters

To cut to the chase (this was supposed to be a quick tip) here's my Google Analytics chunk with the all new isAdmin snippet in action.

What's going on here:

  1. We're calling the isAdmin snippet uncached, as per Caching Guideline 2 for MODX Revolution.
  2. We're checking if the result of the snippet is notempty (so we see if it has data, in the case of our snippet that's a boolean "true" or "1" when a Manager user is logged in). If the snippet returns something we put in an HTML comment, that way you still know the Google Analytics is being parsed.
  3. Next we check the output with the "default" output filter, which is the same as "empty". As we've chained these output modifiers, the snippet would have the HTML comment as value at this point in case the snippet originally returned "1". If it returned "0" it would still be considered empty at this point, which means we dump our Google Analytics code to the screen.
  4. And of course don't forget to close the tag at the end :)

Something else: as you can see I'm also using a setting with key "ga" to store my Google Analytics code in a system-wide or context-specific setting, allowing me to reuse the chunk across contexts without having to change it, by simply setting the right analytics profile ID in the context setting. I'm also telling Google Analytics to track the page load time, which is a nifty statistic to have.

Alright, that's it for now! Enjoy!

Two weeks ago we saw the release of MODX Revolution 2.2 - you probably heard a thing or two about it already. In this article I will introduce to you the new features I think are most impressive.

One of the hardest parts of writing this article is picking which features to discuss. Of course there's the big ones like the ability to use custom resource classes and media sources, but there's also a number of little (and slightly bigger) gems that may be easier to miss and may not have been covered in much detail by others yet. I think I'll cover those here.

New Tag: Comment

This was already added in 2.1.5, but in its simplicity yet powerful application it's worth a mention here plus it's such an easy thing to miss!

Let's take an example of when this comes in handy. When working on a template you need to make some changes in the way your snippet works - but as you'll need to be able of reverting quickly (and you don't run VersionX) - it's not uncommon to copy/paste the old call and just put some random gibberish in front of the name (or was that just me?) like this, to prevent it from outputting.

This trick works because it can't find the "zzzWayfinder" snippet, so it has nothing to output. All good right?

Well, almost. MODX Tags are processed inside out which means that even if it can't find the "zzzWayfinder" snippet, it will still have processed our UltimateParent snippet call, even before it even checks if this "zzzWayfinder" thing exists. That's unneccesary processing time, slowing down your site for no reason! It wont be a devastating performance hit in this example, but every bit helps. The worst part is that, when the new snippet tag works, it's too easy to just leave the old snippet in there in case the client comes back with the request to revert it back next week... just in case that happens, the snippet is not bothering anyone there right?

The new comment tags in 2.1.5 take away that problem. Whenever you use the dash (-) as token on a tag, MODX will see it as a comment and will not execute the tag or any tags contained in it, but it simply discards it. So taking our example, this would be perfect to maximize performance but keep record of the tag (and it's just as easy!):

Move your TVs below the Resource Content

This is something we've been doing in Evolution for a while, and Revolution 2.2 now also gives you the opportunity to move your TVs to below the resource content. It's easier for clients (the tab is easy to miss and makes TVs sound like an afterthought, and what on earth is a "template variable", right?) and, well, with the all new shiny UI it doesn't look too shabby either!!

Moving down the TV panel is easily achieved by setting the "tvs_below_content" system setting to "Yes", resulting in a more familiar look for those still used to Evo. If you fancy, you can also get rid of the title of the all new verticle tabs with the "show_tv_categories_header" system setting, though I personally like to keep it there. 

More OOP than ever

For the hardcore developers among us, this new 2.2 release marks an even more Object Oriented codebase then we've ever seen. Pretty much all the processors (you know, those great things you can call with $modx->runProcessor() that execute requests made to the connectors?) have been refactored to now be class-based. For example, here's what the chunk/create processor (in core/model/modx/processors/elements/chunk/create.class.php) looks like in 2.2:

<?php
require_once (dirname(dirname(__FILE__)).'/create.class.php');
class modChunkCreateProcessor extends modElementCreateProcessor {
    public $classKey = 'modChunk';
    public $languageTopics = array('chunk');
    public $permission = 'new_chunk';
    public $elementType = 'chunk';
    public $objectType = 'chunk';
    public $beforeSaveEvent = 'OnBeforeChunkFormSave';
    public $afterSaveEvent = 'OnChunkFormSave';
}
return 'modChunkCreateProcessor';

You can see the chunk/create processor in 2.1 for comparison on Github, I think it's too big to include here ;)

As you can probably imagine, there's some benefits there to implement that in your own Addon processors, and the three-page long Developing an Extra tutorial in the MODX docshas been updated to match.

Other big, new, fancyness in MODX 2.2

  • Shiny new Manager UI, login screen and setup
  • Command line setup/upgrade (anyone tried this?)
  • Media Sources for better control over file access and base url/path settings
  • Custom Resource Classes of which Articles is the first and I think a pretty impressive example.
  • Static (file based) Elements
  • Automatic minification and compression of assets in the Manager using Google Minify (thanks for the reminder ZAP!)

What's your 2.2 favorite?


I'm blacking out my MODX site this January 18th to protest against the SOPA and PIPA. While I'm not in the US, and my server isn't either, I may not have a direct threath in these two - but I'm with the techies here that think it will have major impact on everyone if this thing passes.. So I developed a little plugin to black out my site (yet give people who need access to my site the ability to do so).

The plugin, SOPA Blackout, is available from the MODX Extras repo for MODX Revolution and is quite simple.

  1. On January 18th 2012, between 8am and 8pm (taken from your server time), the plugin will hijack all first requests made to your site (excluding manager access) and show a message explaining real briefly what's going to happen and give them a link for further information.
  2. In the background the plugin sets a session variable indicating the user has seen the notice. This session variable stores a timestamp which is checked and considered "valid" for three hours, meaning your visitor will only see the blackout once until their session is cleared (browser close) or its been three hours since they saw it.
  3. The user can either refresh the page (the plugin doesn't change the link) or click a link at the bottom of the page to go forward to what they were looking for.

The notice people will get looks like this (heavily borrowed from this wordpress plugin, licensed as GPL):

Easy enough, users will be alerted and can go on their way. It's a little way to show your support to the anti-SOPA and PIPA movements out there.

The notice serves a 503 service unavailable error, so your search engine results wont be affected, though it's unlikely search engines will be able to index content during the time the plugin is active. The plugin also serves a retry-after header which is calculated based on the "until" time set in the plugin configuration (by default January 18th 8pm) - that should let the crawlers know when it's "safe" to return.

My site will serve this message coming January 18th as I refuse to give up free internet without doing, well, something. I hope you will do too. Download the plugin. The source is also on Github.

Oh, by the way, if you want to use different times - just go to the Plugin configuration and change the start/until dates there. Just make sure it's a valid date/time syntax and it should adapt easily.